 Using DFU mode and Apple Configurator is the fastest way to erase and perform a clean installation of macOS on an Apple Silicon Mac.
Unfortunately Apple’s official documentation to Revive or restore a Mac with Apple silicon using Apple Configurator has always given users trouble.
Thankfully there is an easier method I’ve been using with near 100% success for the past year and a half. This method isn’t new but I frequently come across users who struggle to initiate a DFU so I want to help spread the word further.
Read on for the details…
I can’t take any credit for developing this method, again I just want to spread the word.
I first saw these steps when a colleague shared them on the MacAdmins Slack in summer 2021. Their post was in turn a refinement of steps originally posted by Timothy Perfitt on Twitter a few months earlier.
Make sure you have read Apple’s documentation on the process before proceeding, as which USB port to use on the target Mac is critical. You also want to make sure you are using a USB-C and not a Thunderbolt cable. Apple’s USB-C to USB-C charging cable works perfectly for this.
Before starting make sure you have Configurator installed on your host Mac and optionally pre-download the IPSW file for the macOS version you want to install on the target Mac. You can download IPSW files using a tool like Mist or from the table on Mr. Macintosh’s website. Having the IPSW already downloaded will save time later and also make it easy to downgrade to an older version of macOS.
These steps likely work on desktop Macs but I have only been using them on MacBooks:
- Open Configurator on the host Mac.
- Power on the target Mac and let it fully boot. You can be at the FileVault login screen, MDM lock screen or even have a user logged in.
- Connect the host (any port) and target Mac (specific port from Apple’s documentation) with the USB cable.
- On the target MacBook press and hold these four keys simultaneously: Left Control + Left Option + Right Shift + Power/TouchID button.
- While holding those four keys the screen on the MacBook will go off as the Mac shuts down; do not let go yet.
- After the screen goes black continue holding all four keys for an additional three seconds.
- After three seconds release the Control, Option and Shift keys but continue holding Power/TouchID.
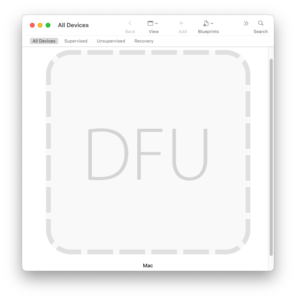 After several more seconds Configurator on the host Mac should show the DFU icon and you can release the Power/TouchID button.

Now just drag-and-drop the IPSW file you downloaded earlier onto the DFU logo and the Restore process will begin. A few minutes later the target Mac will be securely erased and have a clean install of macOS ready to go.
If you need any help join us in the #applesilicon or #configurator-2 channels on the MacAdmins Slack.
UPDATE, 2/22/23: Make sure to read my latest post, DFU Blaster: An even easier method to put a MacBook into DFU mode
Pingback: Weekly News Summary for Admins — 2023-01-27 – Scripting OS X
This worked! Excellent tip!
Thanks!
These instructions actually work compared to Apple’s official ones which just make you end up turning off the computer instead. 😀
Much easier to start with the target Machine turned off.
Connect the target Mac at the DFU port and to any port on the host Mac.
Hold left control and option right shift and power for 10 seconds. Screen will turn on then turn black.
Continue to hold power/touch ID for 8 seconds.
Target Mac will show up in DFU in configurator.
I actually haven’t used the keypress method in over two years since DFU Blaster was released!